

WoT Model Editor
I would like to introduce Model Editor for World of Tanks and World of Warship.
Below you will find link to download program and whole Help Manual I could find for it.
Whole text is just reprint from Help from original Program. It is property of creator not this website.
New and Improved! But wait!… These more!!!!
Most of this program has been completely redone. It loads (as far as I can test) all model formats in the game.
It works with HD models but the lighting is not prefect. (physical base shading is not implemented)
NOTE: there are a few issues with some tracks in HD mode.. I.E. The E-100 German tanks tracks don’t display correctly
in HD mode.. However.. it’s fine in stardard mode.
To get the most out of this tool.. READ! At CURSE there are some tutorials on how to use this.
As far as I know, this is the only tool for exporting models in FBX format. You can load that format
in a very large number of tools.. 3DS, Maya and Blender to mention a few:
I added a way to edit the .vuisuals in side of the editor.. Look under the File menu.
Be aware: If you save a file that you messed up. the game may not load!
BACK UP EVERYTHING BEFORE PLAYING WITH FILES!!!
NOTE: There are MANY different .Visual file formats for the tank models.
If you insert model you may need to manually edit the .visual to add/remove item tags and their values.
This program allows you to load.. export.. import.. translate.. rotate.. scale and finally save the model in the .primitives format.
It also contains a UV map viewer that is capable of saving this map in transparent background .PNG and as a .BMP
This will enable creating custom textures a whole lot easier.
Currently, you can load and export most models in FBX and OBJ file formats.
This allows importing in to other programs such as Maya or 3DS Max.
Once these files have been edited, you can import them back in and write out
the primitives file. The streaming UV2 coordinate set is supported on the models as well.
Steps to making this all work:
1. Get a 3D model editor such as 3DS Max or Maya. Blender is FREE!. (Only if you are actually going to do modding of the geometry)
( you will probably want to get a image editing program.. Paint.net and Gimp2 are free )
2. You will need 7-Zip or other ZIP porgram to extract the packages in the WoT game..
3. Because this app is able to use AutoDesk’s FBX format, You need a 3D program that can import and export FBX files.
4. I have been testing and writing this on a Intel Q9550 with 4gig of mem with an nVidia 8800 GT.
5. You will probably need at least 256meg on your video card.
Set up:
Generally, you will want to create a folder in the root WoT folder like this:
“C:\Games\World_of_Tanks\extracted”
If you have the game installed elsewhere.. you need to create this folder path.
Use 7-Zip to unzip any packages to this folder.
This app uses this path as the root if it can not find textures or other items.
So typically you will have multiple folders within this folder such as: They will be created when you unzip the .pkg.
content
objects
vehicles
and folders within these folders.
The vehicles (Tank Models), will need the objects folder to find the collision skins and other textures that are not stored with the actual models.
“shared_content.pkg” contians the some of the collision textures.
Warning: Extracting folders in to your “res_mods” folder will cause the game to load much slower. Use the “extracted” folder and copy them after making changes.
This app also uses Tao’s wrapper for OpenGL.
This contains code from KatzSmile’s WoTTools program. (Thanks who ever you are for this. I could not of created this with out that bit of code!!)
This program uses Fbx.Net .. Its a wrapper to AutoDesk’s FBXSDK . You probably wont need to download this but I’m putting the link here for you to get info on this Powerful SDK.
Also check out AutoDesk’s free FBX Converter. It allows conversion from FBX to and from other 3D formats.
Also… Fast Colored TextBox by Pavel Torgashov : Simply brilliant syntax highlighting control for the .NET environment. Please read the licenses HERE.
This App uses Display lists. Its deprecated and may not function on later versions of OpenGL. So far this has caused no problems.
Report Issues/Bugs/ to: ME
Please… EMAIL ME if you want to report a bug or ask a question!! Dont post where I wont see it unless I check constantly.. which I dont!
If you are reporting a bug/issue.. give as much info as you can.. screen shot.. text thrown by an exception.. ect.
Ok.. Lets get to it…
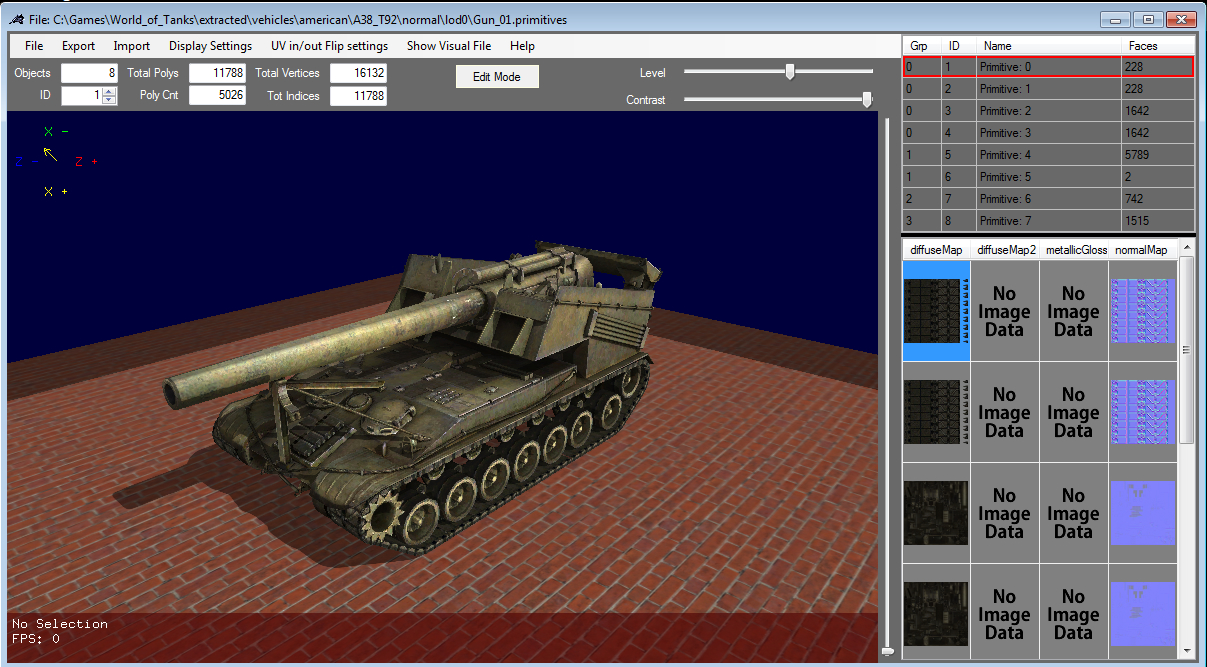
The Main Window…
Here is a list of most of the functions.
| File | Loads and adds Prmitives. Also you can start the Swizzler and Visual programs from here. You can set your working folder. This is where you are extracting things too. The Editor works with World of Warships.. However, do to the differences in file formats, you will need to tell the editor that you are working with WoWs files by unchecking the WoTanks/WoWarships. You can also write the primitive from this menu. |
||
| Export | This drop down will let you export in FBX or OBJ format. OBJ format can NOT export models with dual UV coordinates. FBX is a better choice for most exporting needs. | ||
| Import | From this menu, you can Import a FBX or OBJ format model. You must first select what to overwrite on the left top list of models. You have to have a model loaded to overwrite it. | ||
| Display Settings | This drop down allows you to change display settings like: Shadows on/off and such. | ||
| UV in/out Flip settings | Because Direct3D is different than most 3D applications, you may need to flip the UVs when exporting and importing a model. If after exporting to a program such as 3DS Max and the textures are mapped wrong, use this to flip the UVs so they map properly. | ||
| Show Visual File | This will open a window on the bottom portion of the screen where you can see the visual file. This is only to read the file. Use the Visual Editor under the File menu to actually edit and save the file. | ||
| Edit… Use this to edit a model you added to an exiting model. Dont translate existing Models.. it will break the game! |
|
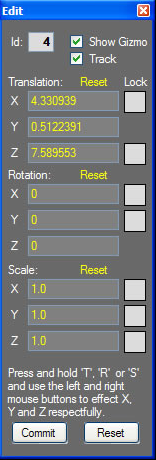
Note that each of these can be reset back to their original state or all of the can be reset using the ‘reset’ button at the bottom.
Also, you can ‘lock’ any axis you do not want to effect.
In WoT, the Y axis is UP, X is left and right and the Z is forward and back. This is a bit confusing but you Will get used to it.
The ‘Commit’ button locks in your changes. It can NOT be undone unless you reimport or reload the primitive.
Track will force the display engine to always look at the center of the primitive you are editing.
Show Gizmo displays navigation helper. This will always be drawn at the averaged center of the primitive.Top Right SlidersThe top one controls the brightness. The bottom controls the contrast.Primitive TableFar right is the Table of loaded Primitives. THIS IS IMPORTANT SO READ IT!!!
Clicking on a row selects that primitive….This is needed to do importing and exporting or editing. Double Clicking will HIDE that primitive and that row will go BLACK. DBL click it again and it will be shown again. You can hide one or all primitives by dbl clicking them. Any row that is clicked will update the ID and Poly Count boxes.Texture TableTHIS IS IMPORTANT SO READ IT!!!
To see a texture and its UV mapping, Double click any image that is there. This doesn’t work with the detailMetalMaps, I dont use them to render and not sure how to.
NOTE: Some times you may see “No Image Data” displayed. It just means there is no Image for that part of the model. Some.. like boundries have no textures at all.
Right clicking will allow you to reload all the images. This saves having to reload the entire primitives file to update any texture (.dds file) changes you may have made.Selection SliderThe long up and down slider next to the texture table is used to cycle thru all triangles that make up a primitive (once you select one by clicking on it with the center mouse button). If the Texture View window is open, you will see these draw as green triangles over the texture. Useful for all you DDS modders out there. This has a known bug of not caring what texture is currently displaying therefore, if the triangle’s map is wacky looking, you probably have the wrong texture loaded in to the viewer.
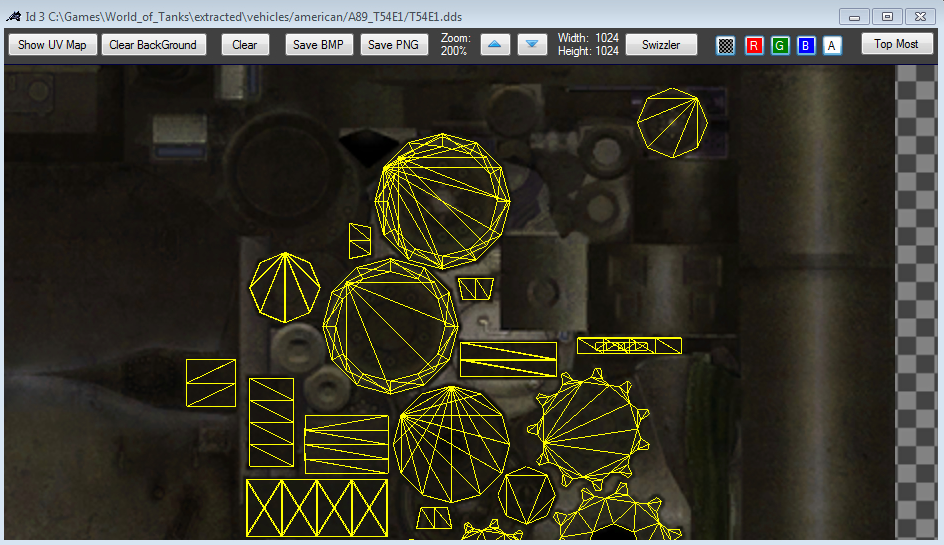
This is the Texture UV viewer. It has been completely redone. It uses OpenGL to draw everything now.
| Show UVs | Does what it says. |
| Clear Background | Shows only the UV outlines. Useful for saving to use as a layer while working on texture maps. |
| Clear | Hides UV outlines |
| Save BMP / Save PNG | Does what it says.. Be careful where you save to. |
| Zoom Buttons.. | In and Out zoom.. You can also do this with the Mouse Wheel. |
| Swizzler | This opens the Swizzler Tool allowing channel remapping. |
| Show/Hide Checkers | Shows or Hides the checkerboard background. |
| Channel Buttons | Show Hide RGBA channels in the texture. |
| Convert to RGB NM | This will coverert a Green/Alpha to a RGB tangent normal map. |
| Top Most | If enabled, This window will sit on top all other windows. |
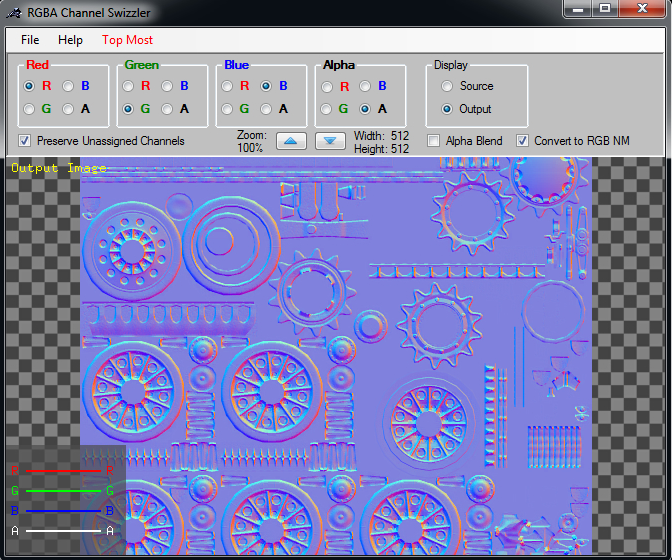
This is “The Swizzler”. A new tool for you texture painters.
I Created this because none of my image editing has this built in.. ( Amazing? )
The main purpose is to change RGB normal maps to GA normal Maps.
You can also use this to “Split off” a single channel in to a texture.
The check box “Convert RGB to NM” will convert the Green Alpha HD normal maps in to good old RGB tangent normal maps.
To get the most out of this.. Please read this over a few times.
This tool will only load and save DDS format files. (Its what the game uses)
The Preserve Unassigned Channels will pass the source channels (RGBA) through to the output UNLESS, it has been reassinged.
In most cases, you will want to UNCHECK this and re-route everything.
The Alpha Blend checkbox enables the alpha to blend with the background. This can be usefull to see whats on the alpha channel.
Display Radio buttons.. What the window is Displaying.. The Source or the Swizzled output Image.
Color Channel Routing Groups. (Red, Green, Blue, Alpha)
To Shut off or Disable a channels routing, DOUBLE CLICK ITS NAME. This will clear the assignment for that channel.
To Re-route, Say the sources Red to the Output’s Green, select that Radio Button.
You can assign mutilple source channels to the same output channel BUT.. only the last assigned channel will effect the output.
There is NO mixing of channels assigned to the same output channel.
Tips: Some of the new RG normal maps contain the alpha used in the final shading in the RED channel. This tool currently does not support more than ONE texture at a time.
You will need to recombine the red channel in your favorite texture editor. (I use Gimp2 and Paint.net)
Maybe if there is interest (Via donations), I’ll add more capablility to this tool. Linking this directly to the model editor for real time updates is one I can think of.
When accessing this tool from the UV texture viewer, the current texture is reloaded. This is because the Model Editor applies Linear Filtering to the textures when the are loaded.
If they are not filtered the textures will display very pixelated when you zoom up on a model. So inorder to avoide working on pre-filtered files, they are reloaded in to Swizzler.
Navigating in the Display window:
Using the SHIFT and left mouse button, you can change the center point where you are looking. Use the CRT and left mouse button to move the center point up and down.
Use the right mouse button to change the view distance. The mouse wheel also zooms in and out.
Double clicking the main render area will make it fill the entire forms window area. Double clicking and puts it back to normal.
Double clicking the right mouse button in the render area will show or hide the Tool Box. The Tool Box contains button shortcuts to the inporting and exporting along with the edit mode button.
Short Cut Keys
| O | Open Primitive |
| A | Add Primitive |
| S | Shadows On/Off |
| T | Cycle Terrain |
| N | Show Surface Normals |
| B | Bump Mapping On/Off |
| D | Diffuse map On/Off |
| W | Wire Display |
| Z | Open The Swizzler |
| F1 | Help |
| F2 | Spin Light |
| F3 | Spin Camera |
| V | Show Shadow Mapping Debug (+ – zoom) |
To select a triangle (or entire primitive) use the center mouse button and click on it.
You can view entire tanks if you follow this order of loading them. The Translations are combined and used as they are loaded so the order is important.
1. Chassis (Treads)
2. Hull
3.Turret
4.Gun
Some tanks I could not figure out the translations. They don’t seem to work as most tanks do. Its OK because this is NOT really designed to view Tank Models.. Its used to export/import and write out individual tank components.
Be careful... Although you can add more models to the currently display list, when doing editing on a model.. load ONLY ONE PRIMITIVE. Other wise, when writing back the file, things will go very bad.
Tank primitives are single objects and usually never have more then ONE primitive per file except for the Chassis.
Its a special case but still.. you can NOT add other objects to the CHASSIS due to its different data structure!!
Tank Collision Primitives break this rule. They contain many hit areas on the tank.
This is not the case with buildings, buildings are usually made of one to many individual primitives, all loaded in to one file. Many other objects in the game have more then one primitive with in one file.
You can NOT cheat by changing ANY models/ primitives in World Of Tanks so.. don’t even try it.
If you do cheat using any mod, hack or what ever, you will probably earn a life time ban. Is it worth the risk?
You should save and test by reloading after every thing you change. If it wont load or display correctly then you probably have an issue with missing textures or the wrong paths in the .visiual file.
If you right click on the Primitive Table list, a small box will show up.
At the bottom of this small box is a button.. “Insert Template”.
Clicking this will … insert … a primitive with NO actual data. It will also insert a position in the Texture table with the “No Image Data” place holder.
This is ALWAYS inserted at the start of the list. Its less to deal with from a programming point of view.
Clicking OK will then rename that primitive to ‘Primitive: 0’ to keep things all tidy and neat.
Once that ‘Template’ is in place, you can import an FBX over it.
The Imported FBX does not have to have the 2nd UV and texture map. My app will deal with this internal but if it does have the 2nd UV and texture maps, the will be used.
Once the FBX is imported, you can move it around using the Edit Panel.
Other things you need to know..
It is very VERY easy to remove polys from a model.. Adding them is a different matter.
Every vertex must be mapped to a UV.. or in the case of a dual UV model.. Both UV maps.
I’m a programmer.. NOT a 3D artist and not good at UV mapping or painting. There are lots of tutorials on how to do this online.
Textures (dds images) of any primitives you add models should be placed or copied to that folder. Look at the folder structures in WoT.
You may need to maually edit the .Visual file so the paths are correct for that texturs you move.
I added a nice tool to edit the visuals feom within the model editor.
The .visual editor converts when it loads. You can use this tool to edit any visual by loading it from its Tool Strip.
A word about Texture Maps in WoT and its UV Coordinates.
There must be exactly the same amout of UV coords as vertices in any model.
Some vertices in some models are duplicated to allow easier UV Mapping.
Changing UVs can be done using an external program such as 3DS Max as long as the count natches the vertices count!
The way they are stored does not allow for any other UV mapping format.
This program contains nothing that is not openly available as code or text describing how things work in World of Tanks.
Any thing I have referenced belongs to the copyright holder. AutoDesk. Tao.. WarGamming.Net..
There is NO data from the game within this program. This is completely my own work which took me many MANY months of studying HEX code and hugh amounts of trial and error.
This Program is free to do what ever you want..
I take NO responsibility if you kill your computer, your copy of the WoT game, yourself, your wife leaves you, your dog bites someone, you burn your house down or get in a car accident. If you have not figured out that changing things in a game is risky, then don’t do it. Think before Acting! Protect your data. Only place in the res_mods folder those things that you absolutely must have there.
I’d ask for donations but I think that is a direct infringement of WarGaming’s rights and its a sad sorta a leaching off some one else’s work.
I wrote this so I could take the bars off the garage door and uncover the image on it. I didnt expect it to grow in to a useable tool that others might find useful.. I did NOT wrtie this to cause harm.
If you try to cheat with this, your crazy after what I explained about the mechanics.
Thank you!
(c) 2015 Coffee_ A.K.A Phux_and_the_Wheel_Bearing